Background
I came across the announcement of the n project on Twitter and decided to have a closer look. This was an abstract number-based NFT project similar to the recent loot NFTs which caused a stir in the NFT space due to being the first ‘abstract’ NFT. I was lucky to see that minting was still open, and decided to mint two for myself. This blog post details a generative artwork project I built on top of the n project.
What is n?
The description of n is “Randomized generated numbers stored on chain” with the tagline “Feel free to use n in any way you want”. You could try to spin it as much as you like, but that’s really it! This was the breakthrough of abstract NFTs that allowed users to build and piece together whatever they like using whatever minimal info the NFT provided.
Each n has 8 numbers, ranging from 1-14, with a total supply of 8888. The n contract has a way to query each digit, but you could also just look at the associated artwork to see the numbers, like on Opensea for example:

Users can use the numbers on n to build some project on top of it, which is then airdropped or sold to n holders. As an example, you could airdrop tokens to n holders, where the holders get up to the sum of their digits on their n, or build some generative artwork depending on their digits. What makes building on n special (or any abstract NFT, really) is that you have an entire community ready to receive your work. While you could charge for your NFTs, even if they’re free, you already have some base audience that welcomes your creation. This is quite different from the normal world, where you’d need to spend time/resources trying to get your work out into some audience, even if you aren’t charging for it.
Generating flat-n
n naturally lends itself to more mathematical work since it only provides numbers, although this doesn’t need to be the case. Remember: “Feel free to use n in any way you want”. Since I had an n, I thought it’d make for an interesting weekend project to build a generative artwork on top of it.
For my generative artwork named flat-n, I decided to use the 8 digits as 4 2-d points which would then be plotted into a quadrilateral. To start, I needed to scrape all of the digits of each n, which I did with the following script:
1
2
3
4
5
6
7
8
9
10
11
12
13
14
15
16
17
18
19
20
it("writing the points", async function () {

let pointsList;
for (let i = 1; i < 8889; i++){
    let x_1 = '['+ await n.getFirst(i.toString()) + ',' + await n.getSecond(i.toString()) + ']';
    let x_2 = '['+ await n.getThird(i.toString()) + ',' + await n.getFourth(i.toString()) + ']';
    let x_3 = '['+ await n.getFifth(i.toString()) + ',' + await n.getSixth(i.toString()) + ']';
    let x_4 = '['+ await n.getSeventh(i.toString()) + ',' + await n.getEight(i.toString()) + ']';
    points = x_1 + x_2 + x_3 + x_4 + "\n";
    console.log(points);
    pointsList += points;
}
var fs = require('fs');
var stream = fs.createWriteStream("output.txt");
stream.once('open', function(fd) {
    stream.write(pointsList);
    stream.end();
});

}).timeout("250000");
This fetched and stored all of the n points in the following format:
1
2
3
4
5
6
7
8
9
10
[5,4][7,3][9,8][6,3]
[8,4][8,9][7,5][9,9]
[9,11][6,8][5,1][5,6]
[6,9][7,9][9,3][7,1]
[10,6][10,7][8,10][9,7]
[5,2][6,9][4,8][9,7]
[6,4][8,3][4,7][6,4]
[9,7][8,5][3,1][7,2]
[3,4][2,9][9,2][9,4]
[10,5][6,7][5,4][6,3]
Each 2-d co-ordinate corresponds to a point on the quadrilateral, with the points joining from x_1->x_2->x_3->x_4->x_1 for [x_1][x_2][x_3][x_4] as above. To draw the quadrilateral, the points are split and sent to a Polygon in the python matplotlib module:
1
2
3
4
5
6
7
8
9
10
11
12
13
14
15
16
17
18
19
20
21

#read and split the co-ordinates
line = f.readline()
x_1 = line.split('[')[1].split(']')[0].split(',')
x_2 = line.split('[')[2].split(']')[0].split(',')
x_3 = line.split('[')[3].split(']')[0].split(',')
x_4 = line.split('[')[4].split(']')[0].split(',')

#collect the points and make a polygon
pts = np.array([[x_1[0],x_1[1]], [x_2[0],x_2[1]], [x_3[0],x_3[1]], [x_4[0],x_4[1]]])
a = (int(x_4[0]) + int(x_4[1]))/56
p = Polygon(pts, antialiased=True, closed=True, edgecolor='black', linewidth=2.5,alpha=0.5+a,joinstyle='round')

#display the polygon
ax = plt.gca(aspect='auto')
ax.add_patch(p)
ax.autoscale_view()
#save the pic with the NFT id
plt.savefig(str(x+1)+'.png')
#clear the plot
plt.clf()
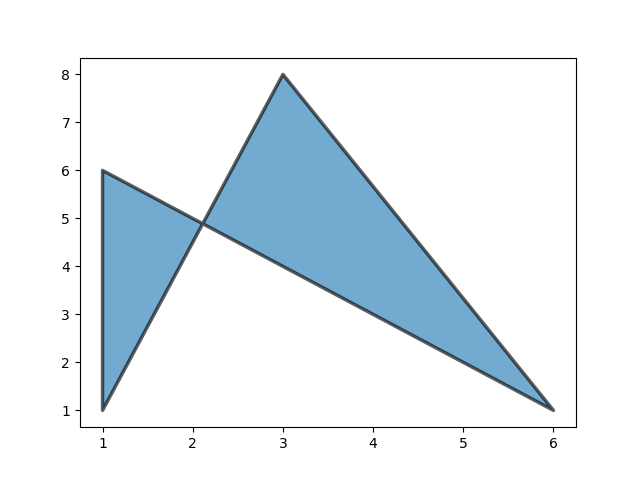
For example, n 42 has co-ordindates [6,1][3,8][1,1][1,6], which corresponds to the following flat-n:

We can see that it’s a complex quadrilateral with the co-ordinates in order as explained above. We still need to do some tweaking like scaling and removing the axis, and of course some colouring. For no reason other than liking the colours, I chose the following colormaps and background colours for each flat-n as follows:
- For
n ID %4 == 0, usetab20ccolormap andthistlebackground colour - For
n ID %4 == 1, usecoolcolormap andcornsilkbackground colour - For
n ID %4 == 2, useSet1colormap andlightcyanbackground colour - For
n ID %4 == 3, usegist_heatcolormap andlightgreybackground colour
After some trial-and-error, the following sample artworks were created:

The final script can be found below:
1
2
3
4
5
6
7
8
9
10
11
12
13
14
15
16
17
18
19
20
21
22
23
24
25
26
27
28
29
30
31
32
33
34
35
36
37
38
39
40
41
42
43
44
45
46
47
48
49
50
51
52
53
54
55
56
57
58
59
60
61
#!/bin/python3

import numpy as np
import matplotlib as mpl
import matplotlib.pyplot as plt
from matplotlib.patches import Polygon
from matplotlib.patches import Rectangle

#read the coords in some other folder in this disorganized project
f = open("../../output.txt", "r")
for x in range (8888):

    #format the points
    line = f.readline()
    print(str(x+1) + ": " + line)
    x_1 = line.split('[')[1].split(']')[0].split(',')
    x_2 = line.split('[')[2].split(']')[0].split(',')
    x_3 = line.split('[')[3].split(']')[0].split(',')
    x_4 = line.split('[')[4].split(']')[0].split(',')

    #create the polygon
    pts = np.array([[x_1[0],x_1[1]], [x_2[0],x_2[1]], [x_3[0],x_3[1]], [x_4[0],x_4[1]]])
    a = (int(x_4[0]) + int(x_4[1]))/56
    p = Polygon(pts, antialiased=True, closed=True, edgecolor='black', linewidth=2.5,alpha=0.5+a,joinstyle='round')

    #used for scaling
    ax = plt.gca(aspect='auto')
    totX=int(x_1[0]) + int(x_2[0]) + int(x_3[0]) + int(x_4[0])
    totY=int(x_1[1]) + int(x_2[1]) + int(x_3[1]) + int(x_4[1])
    maxX=max(int(x_1[0]),int(x_2[0]),int(x_3[0]),int(x_4[0]))*1.01
    maxY=max(int(x_1[1]),int(x_2[1]),int(x_3[1]),int(x_4[1]))*1.01
    imdata = np.random.randn(int(totX)+int(maxX), int(totY)+int(maxY))

    #switch the shape color scheme
    id = x + 1
    col = plt.cm.gist_heat
    plt.rcParams['savefig.facecolor']='lightgrey'
    if (id % 4 == 0):
        col = plt.cm.tab20c
        plt.rcParams['savefig.facecolor']='thistle'
    elif (id % 4 == 1):
        col = plt.cm.cool
        plt.rcParams['savefig.facecolor']='cornsilk'
    elif (id % 4 == 2):
        col = plt.cm.Set1
        plt.rcParams['savefig.facecolor']='lightcyan'
    im = ax.imshow(imdata, extent=(0, maxX, 0, maxY), cmap=col, zorder=1)

    #add the polygon
    ax.add_patch(p)
    im.set_clip_path(p)
    #scale it so all shapes look the same size
    ax.autoscale_view()
    #we don't want the axes in the pic
    plt.axis('off')
    #save the pic with the NFT id
    plt.savefig(str(x+1)+'.png')
    #clear the plot
    plt.clf()
f.close()
Art pinning and metadata anchoring
Once generated, you’ll need to think about how we’re going associate each artwork to an NFT in it’s metadata. From the few tutorials I read, it seemed that most NFTs associated it’s metadata anchoring an IPFS link pointing to some JSON file. This JSON file includes NFT data and usually includes a link to the artwork pinned on IPFS. Read why you’d want to use IPFS to pin asscociate artwork to an NFT here.
Usually, this is set as the URI when the user mints the artwork. Since I wanted to timebox this into a 1-day project, I didn’t want to set up a frontend to do all of that. This meant I needed to pin the artwork & metadata to IPFS in a way that could be generated without needing to ask users to update the token URI when minting a flat-n. Intially, I tried using the recommended IPFS service pinata.cloud, however, the front-end was breaking since there were 8888 pictures in a single folder that needed to be uploaded. Luckily, there’s an API that can be used to upload a single folder. In this way, we just need the folder link and each picture can be pulled dynamically by replacing the n ID. As an example, https://ipfs.io/ipfs/QmcUCAAwtXLAgFp6kjENc676S8QBx5dyZcvfk4huYxdAVi/42.png can be used to fetch any flat-n art by replacing the n ID as required.
Now that we have the artwork pinned to IPFS, we needed to generate the NFT metadata with it and pin each metadata file as well. We can generate flat-n metadata that includes a name, description and image URL by modifying the create-metadata.js script as follows:
1
2
3
4
5
6
7
8
9
10
11
12
13
14
15
16
17
18
19
20
21
22
23
24
25
26
27
28
29
30
const fs = require('fs')
const hre = require("hardhat");


const metadataTemple = {
    "name": "",
    "description": "",
    "image": ""
}
async function main() {
    for (let i = 1; i < 8889; i++) {
        //console.log('Metadata for flat-n #' + i.toString())
        let flatMetadata = metadataTemple
        flatMetadata['name'] = "flat-n #" + i.toString()
        flatMetadata['description'] = "The quadrilateral generated and coloured by numbers from the-n-project NFT #" + i.toString()
        flatMetadata['image'] = "https://ipfs.io/ipfs/QmcUCAAwtXLAgFp6kjENc676S8QBx5dyZcvfk4huYxdAVi/" + i.toString() + ".png"
        filename = 'metadata/' + i.toString()
        let data = JSON.stringify(flatMetadata)
        //console.log(data)
        fs.writeFileSync(filename + '.json', data)
    }
}

main()
  .then(() => process.exit(0))
  .catch((error) => {
    console.error(error);
    process.exit(1);
  });
Once all the JSON metadata files are created, it can be pinned to IPFS similarly to how we pinned the artwork in a single folder. As an example, https://ipfs.io/ipfs/Qmbfw3NtUXw8kX9EoEefWswNobjTaewECeNa6itQiPRNNt/42.json can be used to fetch any flat-n metadata by replacing the n ID as required.
Contract dev and deployment
All that’s left to do is write the ERC721 smart contract and deploy it. Writing the contract was fairly straight forward since the n-pass, an n starter pack for n builers, was available to use. All that needed to be done was to inherit from the given NPass contract and override or add any functions as needed. For example, all flat-n needed was a custom URI function to point to the correct the metadata in the pinned folder on IPFS. The final contract is shown below:
1
2
3
4
5
6
7
8
9
10
11
12
13
14
15
16
17
18
19
contract FlatN is NPass {
    using Strings for uint256;

    constructor(
        string memory name,
        string memory symbol,
        bool onlyNHolders
    ) NPass(name, symbol, onlyNHolders) {}

    function tokenURI(uint256 tokenId) public view virtual override returns (string memory) {
        require(_exists(tokenId), "ERC721Metadata: URI query for nonexistent token");

        string memory baseURI = _baseURI();
        return bytes(baseURI).length > 0 ? string(abi.encodePacked(baseURI, tokenId.toString(),".json")) : "";
    }
    function _baseURI() internal view virtual override returns (string memory) {
        return "https://ipfs.io/ipfs/Qmbfw3NtUXw8kX9EoEefWswNobjTaewECeNa6itQiPRNNt/";
    }
}
All that was left to do is deploy the contract. All this means is modifying the deploy script and run the following commands:
1
2
$ yarn hardhat --network mainnet deploy --gasprice "170000000000"
$ yarn hardhat --network mainnet etherscan-verify
That’s it! 🥳 You can now use the EOA associated to the deployer’s private key and setup your collection on OpenSea. I’ll be honest, it’s a great feeling to see your artwork come together and your collection up and running!

Conclusion
Overall, this was a fun weekend project and I learnt a lot. Besides just learning the ins-and-outs of NFT metadata generating and deployment etc, I found that I’ve been missing out on building smart contracts. Besides being creative, it’s quite a different mindset from trying to find security holes in the code. If you’re on solely either end of building or breaking, I’d recommend trying the opposite task just to get a fresh perspective of smart contracts :)
Bonus ⚡
I created a lending contract to flashloan n NFTs at a fixed cost set by the original owner. This can be used to mint any or all available n derivatives at a single cost (and anything else in the tx, much like a normal flash loan). Testing and deploying this contract fell to the bottom of my todo list, so I’m opening it up to anyone who wants to use it for themselves. The flattened (flat-n’d?) contract can be found here. I’ve tried my best to code it cleanly, but I take no responsiblity for any bugs that may be in the contract! Use at your own risk :)
